jueves, 1 de julio de 2010

Power NURBS Pro 7.00 for 3Ds Max 2010-2011 (32/64-bit)
")
Power NURBS - это мощное средство трехмерного моделирования, сочетающего в себе преимущества самых современных технологий, используемых для построения объемных моделей
Скачать:
Letitbit.net
Turbobit.net
VRay Studio Setup Pro v.1.0 for 3ds max

VRay Studio Setup Pro - это скрипт, включающий в себя все необходимые компоненты для создания студийной визуализации.
Скачать:
Letitbit.net
Turbobit.net


Sunset exterior scene / Сцена экстерьера

Sunset exterior scene
формат max| V-Ray | текстуры включены | 127 Mb
Скачать:
Letitbit.net
Unibytes.com
Turbobit.net
Моделирование автомобиля BMW X5 в 3ds Max

В данном видеоуроке подробно рассматривается процесс создания модели автомобиля в 3ds Max
формат AVI | язык: русский | 314 Mb
Скачать:
Letitbit.net
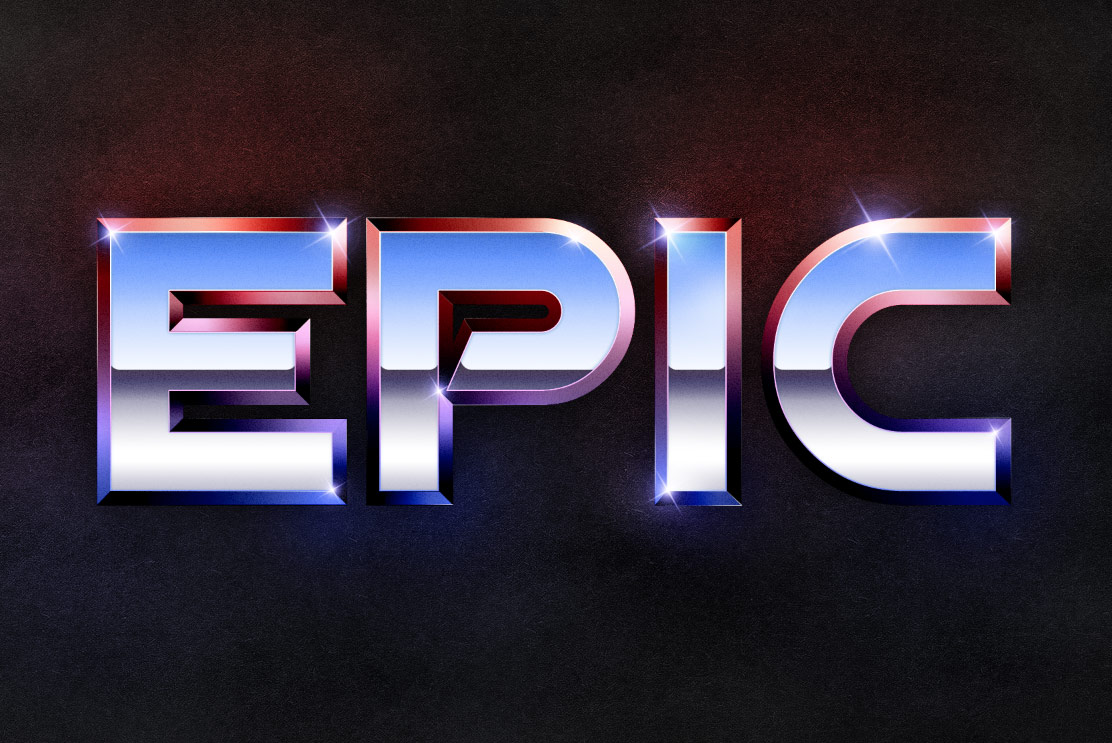
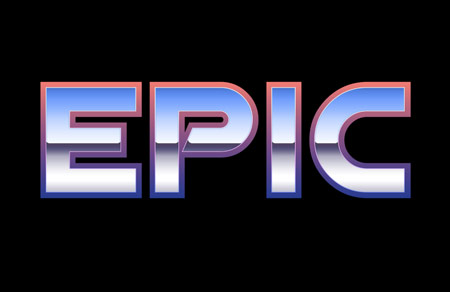
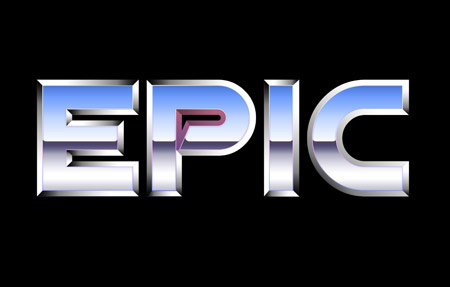
Recreate the Epic 80’s Metal Text Effect in Photoshop

It’s funny how trends reappear through the years. The bright and shiny chrome text effect could be found everywhere in the 80s, then it disappeared altogether when people realised how hideous and gaudy it was. Recently though, this text styling seems to be making a comeback in the world of digital art as the 80s generation are implementing inspirations from their childhood into their designs and artworks. Follow this tutorial to recreate the epic metal text effect for yourself, making use of modern day digital design techniques in Photoshop.
1980’s Inspiration
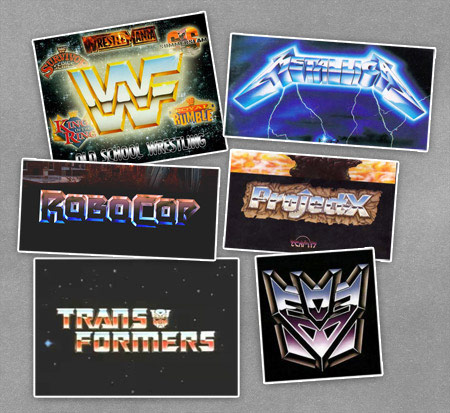
WWF Wrestling, Metallica’s Ride the Lightning album, Robocop, Amiga games and Transformers are all examples that I can relate to. As a little initial research, collect a few logos and graphics to refer to when creating your own text effect. Look closely at the colours used, the style of text and what seems like a desert landscape in the reflection of the text.
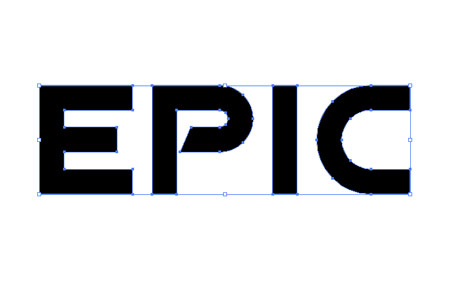
We’ll begin in Illustrator for the first couple of steps to lay out our type. Set out the wording of your choice in an appropriate font and convert the text to outlines (CMD+Shift+O). Here I’m using the font Viper Squadron, and the word ‘Epic’.
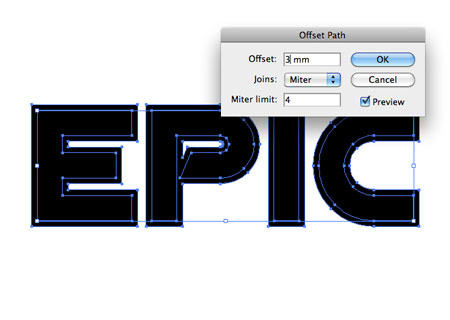
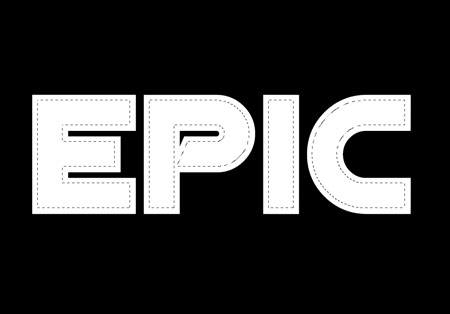
With the shapes selected, go to Object > Path > Offset Path. Enter 3mm in the options box. Right click on the objects and select Ungroup.
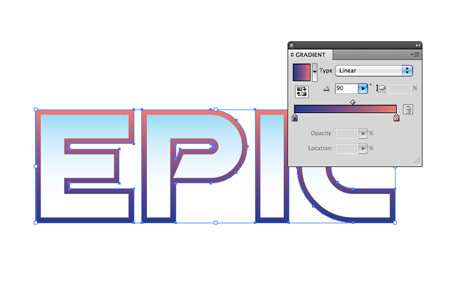
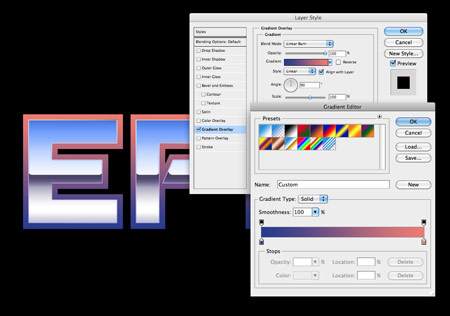
Add a couple of basic gradient fills to the two shapes to make it easy to identify them. A sky blue to white on the inner shape and a red to blue gradient on the outline will do the trick.
Draw a temporary rectangle around the text, then select this along with the outer shape. Paste the objects into Photoshop. Repeat the process but this time with the inner shape. The temporary rectangle will maintain the proportions between the two objects when copied through to Photoshop.

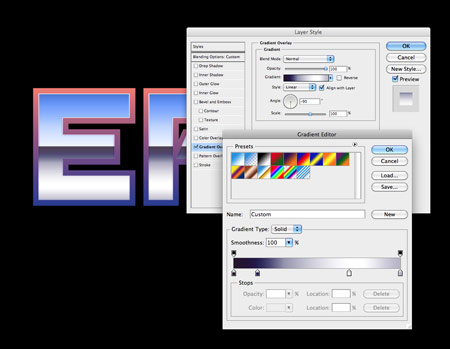
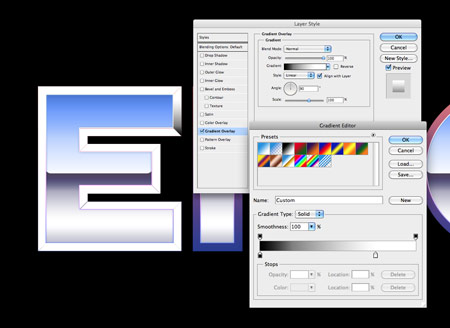
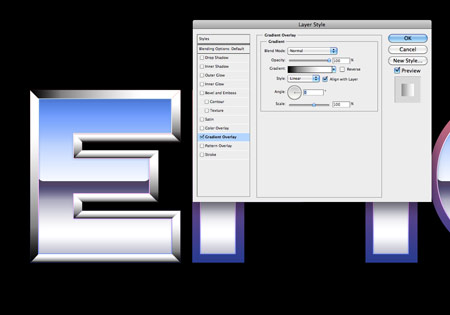
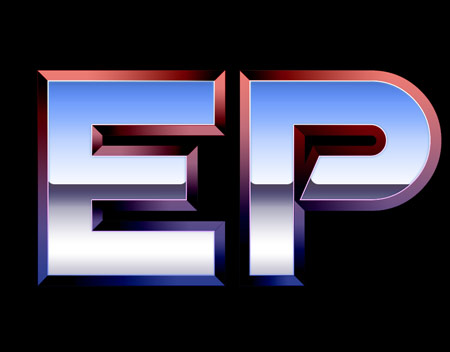
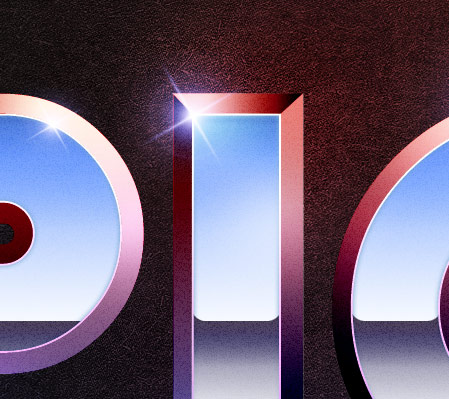
Double click the inner shape layer and begin adding some layer styles. Start by replacing the fill with a Gradient Overlay. Use dark blue (#426bc7), light blue (#719cff) and white (#ffffff) swatches and run the gradient vertically from the top.
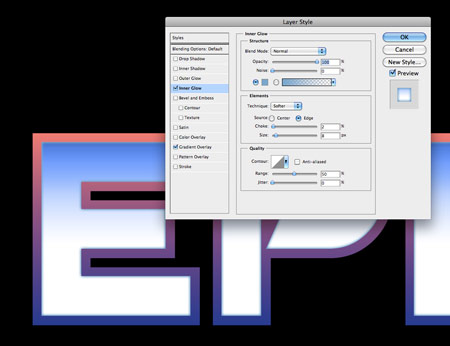
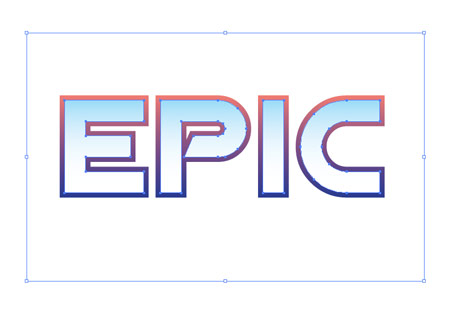
Next, add a soft Inner Glow using a mid-blue (#76a5cd), set the opacity to 100%, blending mode to Normal, size to around 8px and add a 2px stroke to accommodate the stroke in the next step.

Add a 2px stroke in white, then set the alignment to the Inside and blending mode to Color Dodge. Adjust the opacity to around 60%.
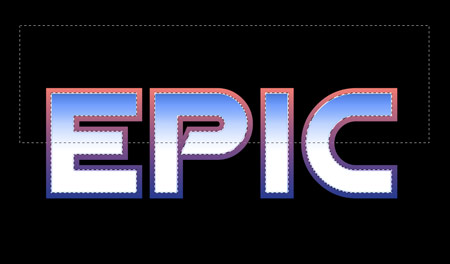
Hold the CMD (Mac), or CTRL (Windows) key while clicking the thumbnail of the inner-text layer to load the selection. Grab the Rectangular Marquee tool and hold Alt while dragging a selection across the upper portion of the text, leaving just the lower half selected. Fill this with white on a new layer.
Double click the layer to open up the layer styles and add a vertical gradient running from dark indigo (#261528) to mid-indigo (#241e53) to white (#ffffff) to a very light indigo (#b6b4c7).
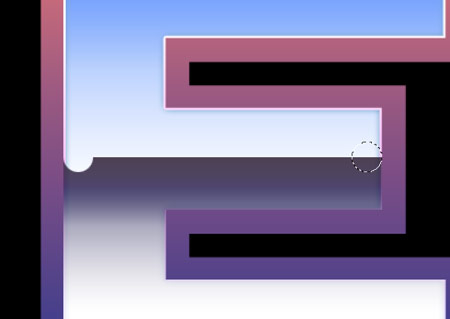
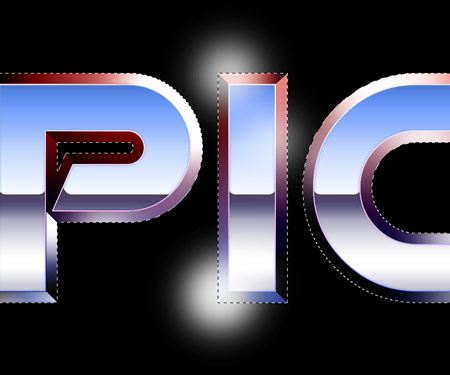
Zoom right in and draw a circular selection at each end of the reflection gradient layer on each letter.
Use the rectangular marquee tool to remove the middle portion between each circle. Repeat the process on every other letter.
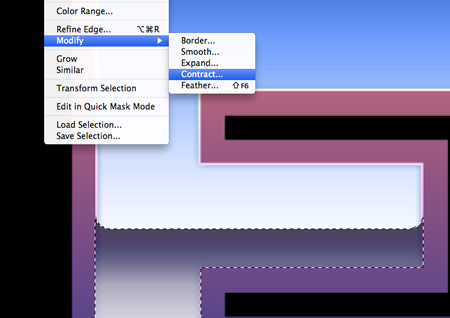
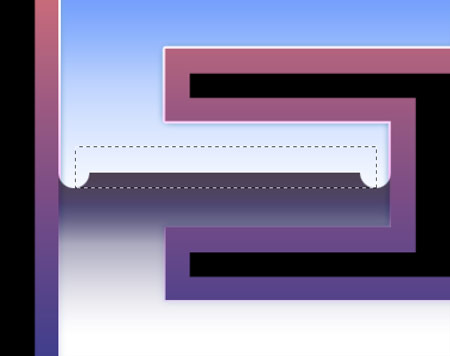
Load the selection of the reflection layer, then go to Select > Modify > Contract. Enter 2px to reduce the mask size to accommodate the stroke, then inverse the selection (CMD+Shift+I) and delete.
The text is beginning to develop some definition with the gradients and stroked outlines. Now let’s start work on the chamfered edge.
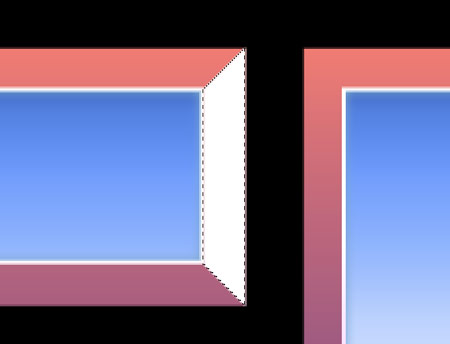
Zoom in and draw around each edge of the outer outline with the Polygonal Lasso tool. Close the path by cutting diagonally across the outline at each corner. Fill each edge with white on individual layers.
Add a simple black to white gradient on one of the shape layers. Right click the layer and select Paste Layer Style, then select all the other layers and paste the same layer style.
The gradient is running in the wrong direction on the horizontal shapes, so tweak each one by adjusting the angle of the gradient fill.
Repeat the process on every other letter. Aim to contrast black against white on each shape to highlight the diagonal edge lines.
CMD-click the layer of the original outline shape and fill a new layer with white. Then CMD-click the original inner shape layer and delete this selection from the fill.
Replace this white fill with a blue (#283891) to red (#f07b71) gradient using the layer style options.
Change this layer’s blending mode to Linear Burn to allow the gradient overlay to replace the colour of the white to black gradients underneath.
Dab a few spots of white across the text to add a variety of highlights and tones. Load and inverse the selection of the text layer and delete out the excess from the highlights layer.

On a new layer, draw some 1px white lines across the straight edges of the text to act as highlights.

Add a layer mask to the highlighting lines layer and erase out the ends of the lines with a soft brush.
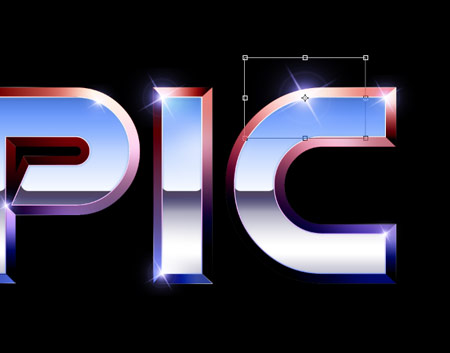
Find a stock lens flare and paste in multiple copies to highlight the edges and corners of the text.

Load the outer text selection and fill a new layer with white. Add a Noise filter (Filter > Noise > Add Noise) with the settings 10%, Uniform & Monochromatic. Change this layer’s blending mode to Color Burn to allow the texture to interact with the text.
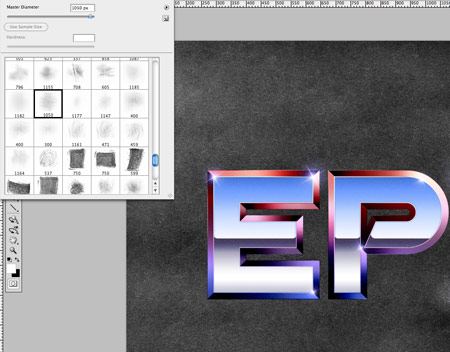
The text effect is just about complete, but let’s finish off the design with a subtle background. Use some Subtle Grunge Brushes to add some background texture to the design. Reduce the opacity down to around 30%.
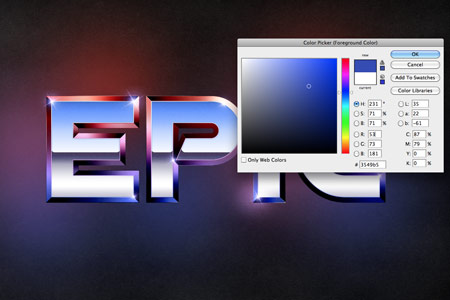
Dab some large spots of colour above the texture layer, but below the text. Use samples of blue, red and purple from the outer edges of the text.
Change the blending mode to Color Dodge at 80% to allow the colours to interact with the textured background.
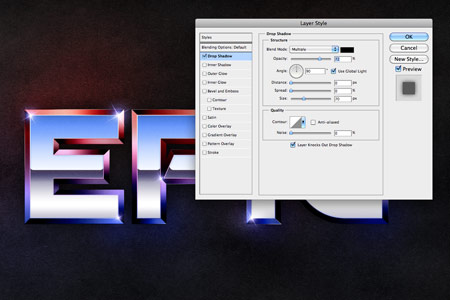
Finally add a soft Drop Shadow to the outer text outline layer to anchor the text with the background.
CD Tipos Latinos


-
Detailed Semi-Trucks 5 EPS | + JPEG Preview | 13.56 Mb Download Provider - Heroturko.com leti...

